


iPhone users, these tips are for you!
From lighting to camera hacks– there’s a bit of everything here. Some info you may already know (oooh, look at you!), and others might be totally new concepts– either way, you got it!
At the end of this article, you’ll be able to fully utilize your iPhone’s photo modes, capture all your best angles, and have a few photo tricks up your sleeve for social media snaps.
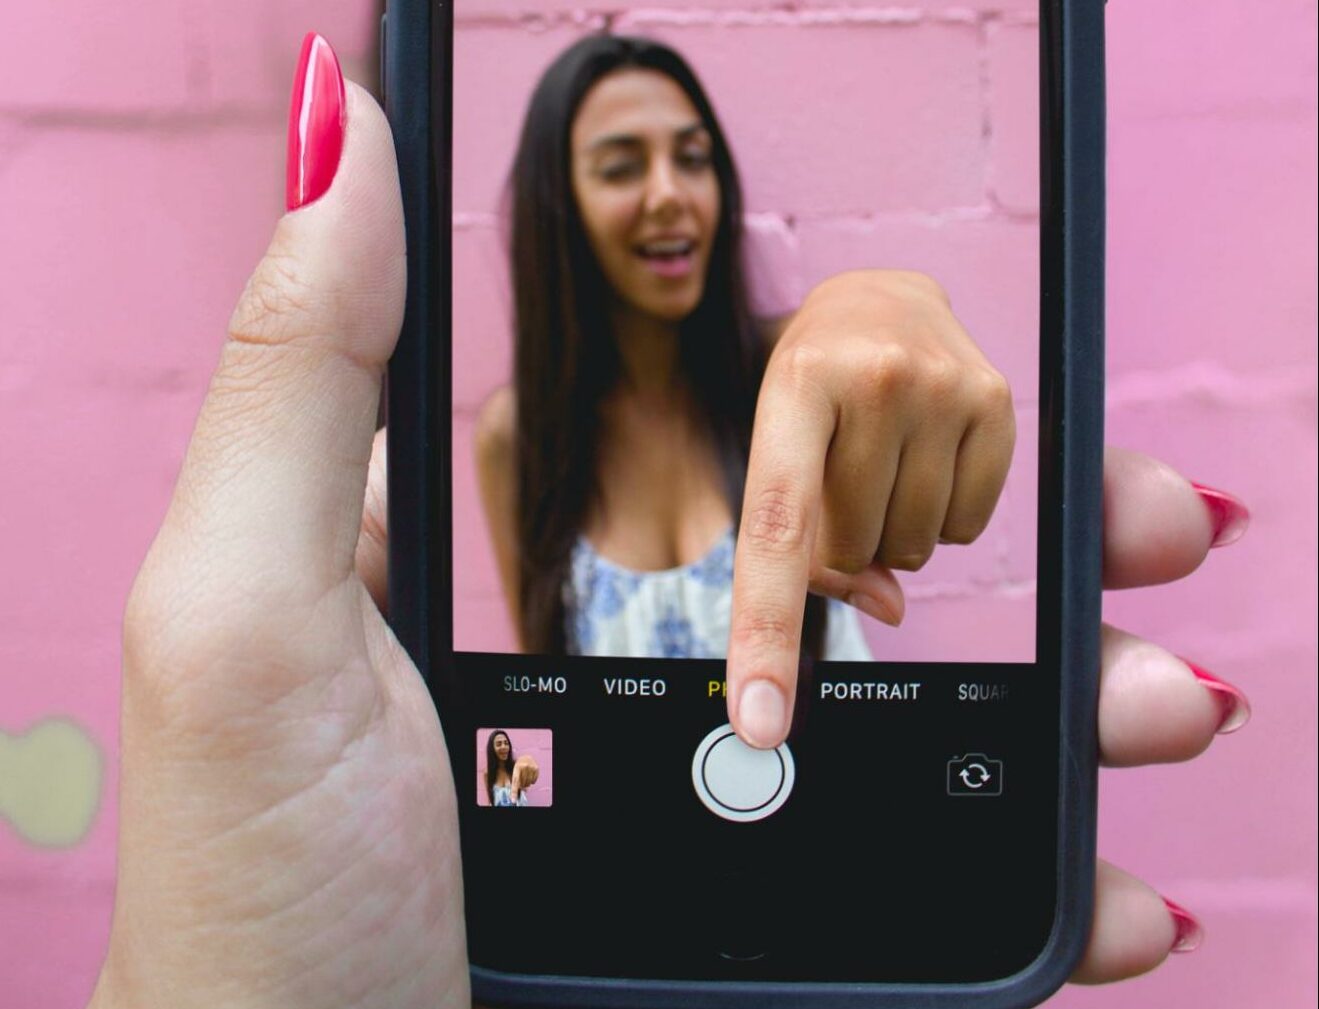
1. Shoot on the back camera.
It’s undeniable– the back camera has finer image quality and photo specs.
iPhone front and rear cameras are both 12MPS, but the back camera offers a versatile depth of field, ranging from f/1.8-2.4, whereas the front camera has a fixed depth of f/2.2. The depth of field is the distance between the closest subject (the one in focus) and the furthest subject/background. If the field is deeper, more of the background is in focus.
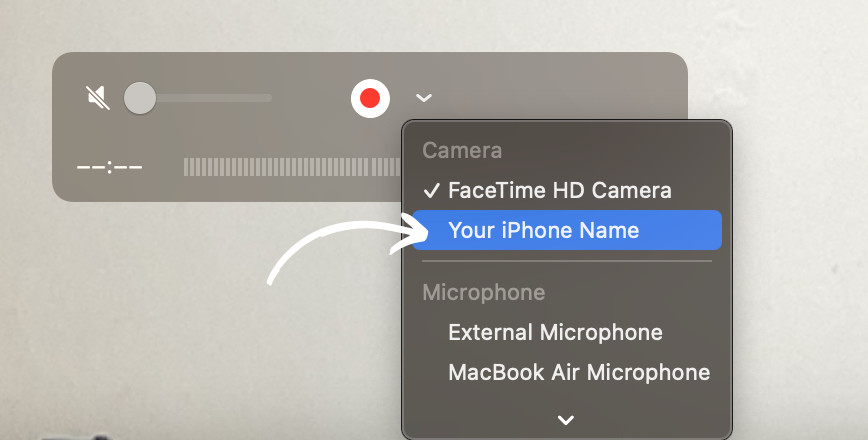
When taking photos with the back/main camera, use a tripod for stability and a self-timer. There are two ways to see yourself while using a back camera:
On a Mac device:
- Plug your phone into your Apple computer/laptop
- Open Quicktime Player
- Go to File, New Movie Recording

- Click on the dropdown arrow next to the record button, and press your phone’s device name under the Camera tab
On an AppleWatch:
- Open the camera app on your AppleWatch.
- Position your phone as necessary.
- Click the 3s Shutter button on your AppleWatch.
2. Lock the focus.
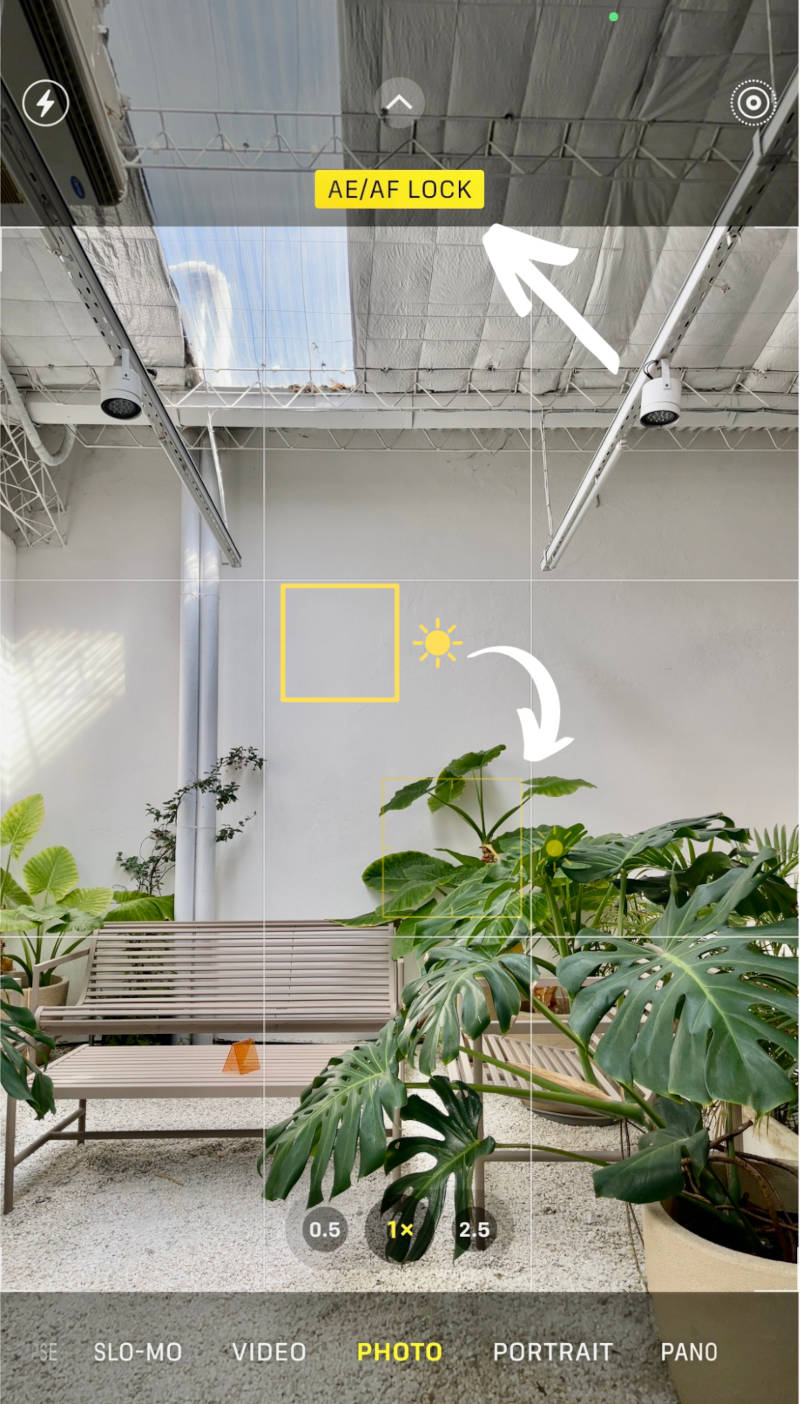
When shooting photos in back-camera mode, tap on the screen to lock the focus of the image. You should see a yellow square appear– that’s your focal point. In this screenshot, the focus is locked on the green leaves in the background of the image. Notice the AE/AF LOCK is turned on.
The focus allows the subject to have its own separate lighting composition. Otherwise, the whole image blends together, and there’s no real emphasis on the main part of the photo as there should be.
This is vital when capturing portraits in front of sunsets or brightly-lit backgrounds. Most of the time, the focal point should be set on the subject in daytime lighting conditions. However, in sunset/sunrise photos and low-light images, tap on the background to set the focal point instead. The subject will be dark, but the background will be true to color. Take the photo. After, adjust the shadows in your phone’s photo editing settings to lighten up the subject; meanwhile, your background will keep its natural colors.
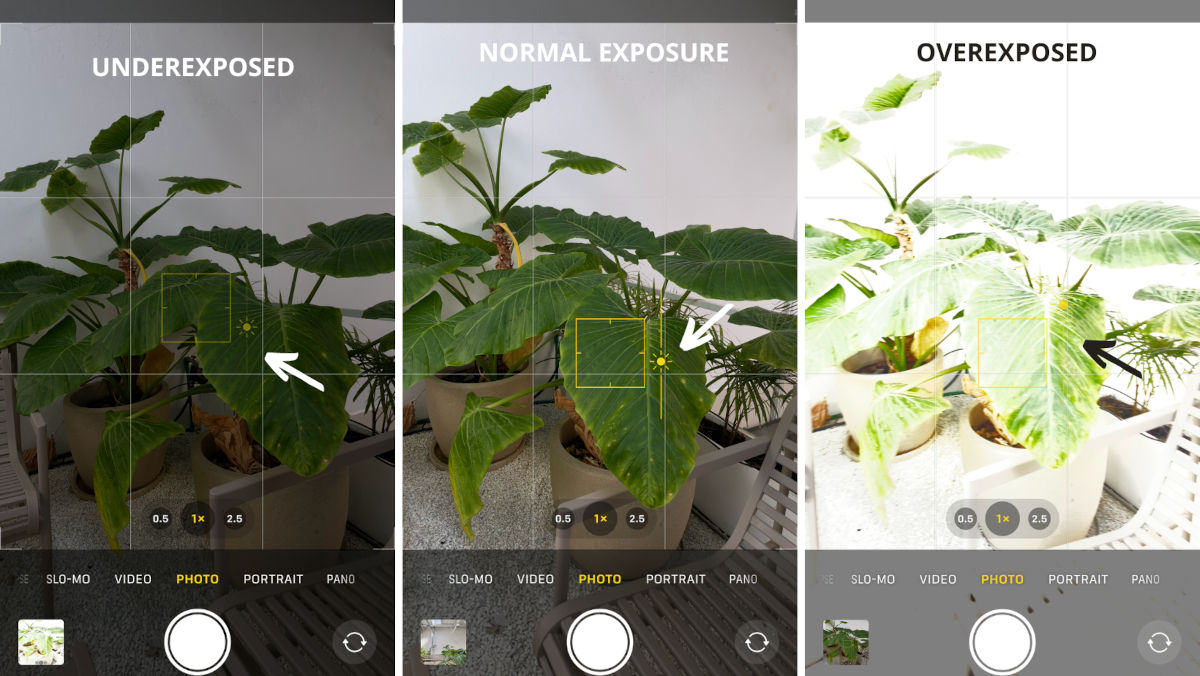
3. Manually adjust the exposure.
Exposure = brightness.
Similarly to locking the focus, tap the screen on the part of the image that you want to focus on, and then adjust the sun-icon slider to the right of the focal lock.
Nine times out of ten, it’s better to adjust the brightness down rather than up to keep clarity and sharpness. When you have a photo that is “underexposed,” you can adjust the shadows and dark areas without losing image quality. If the image is shot “overexposed,” the whites and highlights are blown out, too bright to keep image quality intact. When editing a brighter photo, there will be grainy pixels or “noise.” See below.
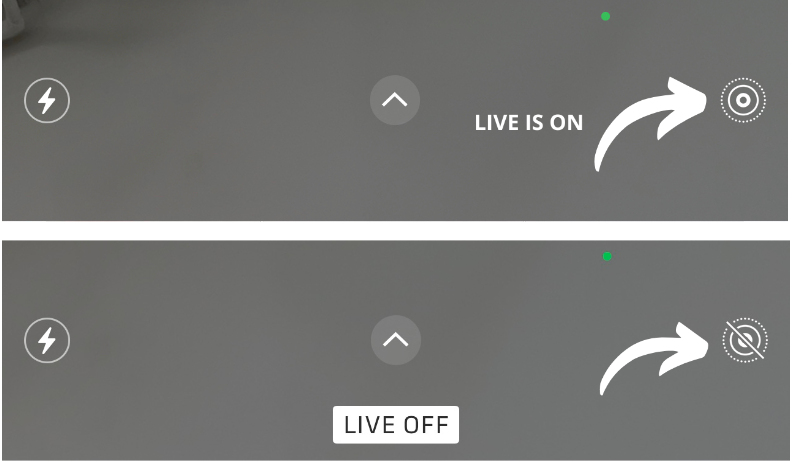
4. Turn on “Live Photos”.
Camera App > Bulls-eye “Live Photo”
To capture natural expressions without awkwardness, turn on Live Photos (available on iPhone 6 or later).
This setting is like taking a 3-second video, but better, because it upholds the image quality of a photo instead of a blurry screen capture from a video still.
To turn on Live Photos, click on the bulls-eye-looking icon in the top right corner of your phone camera. If the symbol is crossed out, it is off.
After capturing your pic, grab the moment that captures you best by clicking the “edit” button at the bottom of the screen, tapping the live photo icon in the editing menu, choosing your favorite snap, and setting it as the “Key Photo.”
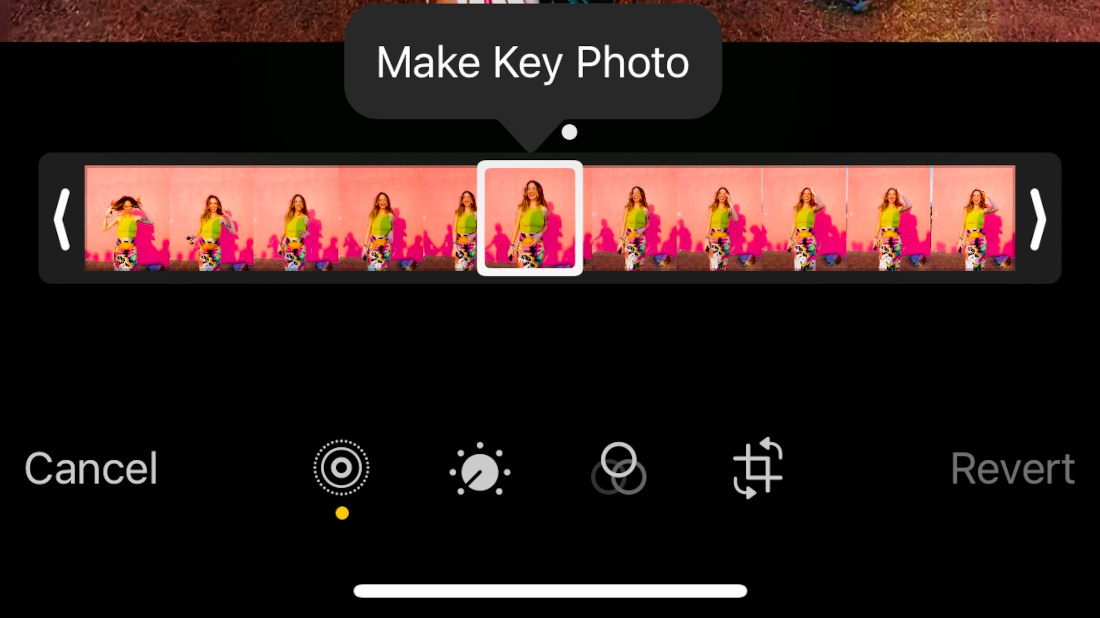
Whala! A cheeky capture of a natural smile without any awkward countdowns or smile lines from clenching your grin for minutes.
5. Turn on “HDR.”
Settings > Camera > Smart HDR
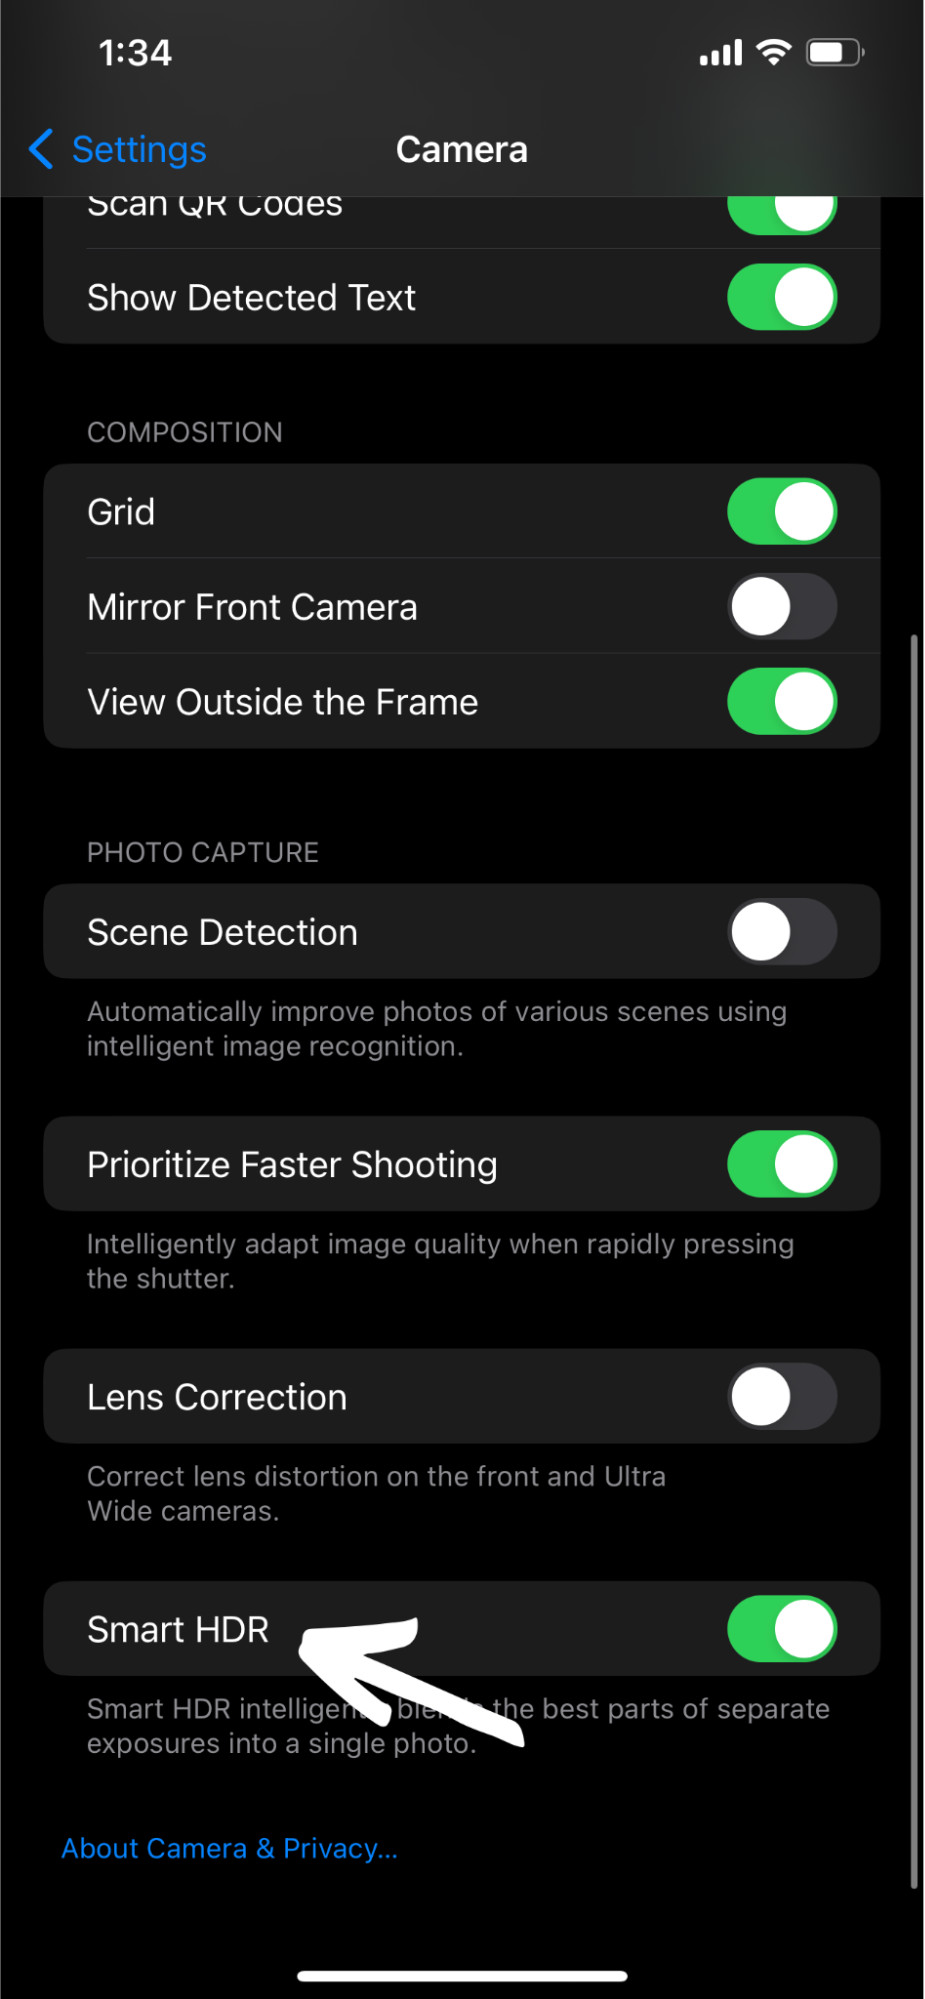
HDR stands for “high dynamic range,” capturing multiple photos of the same scene and blending them together to achieve the best result. Rather than the original snap, the camera automatically shoots three photos; dark, medium, and bright. The outcome results in a photo combining the detail from the brightest and darkest areas to have a well-composed, well-lit image.
If you’re shooting with intentional lighting or a specific creative vision, you may want to turn off this setting so it doesn’t make automatic adjustments for you. This is the case with moody lighting, as HDR will make everything much more colorful than you’re going for.
In all other instances, let HDR do its thing, adding vibrance, shadows, and highlights to your photos.
6. Use the camera grid.
Settings > Camera > Composition Tab > Grid
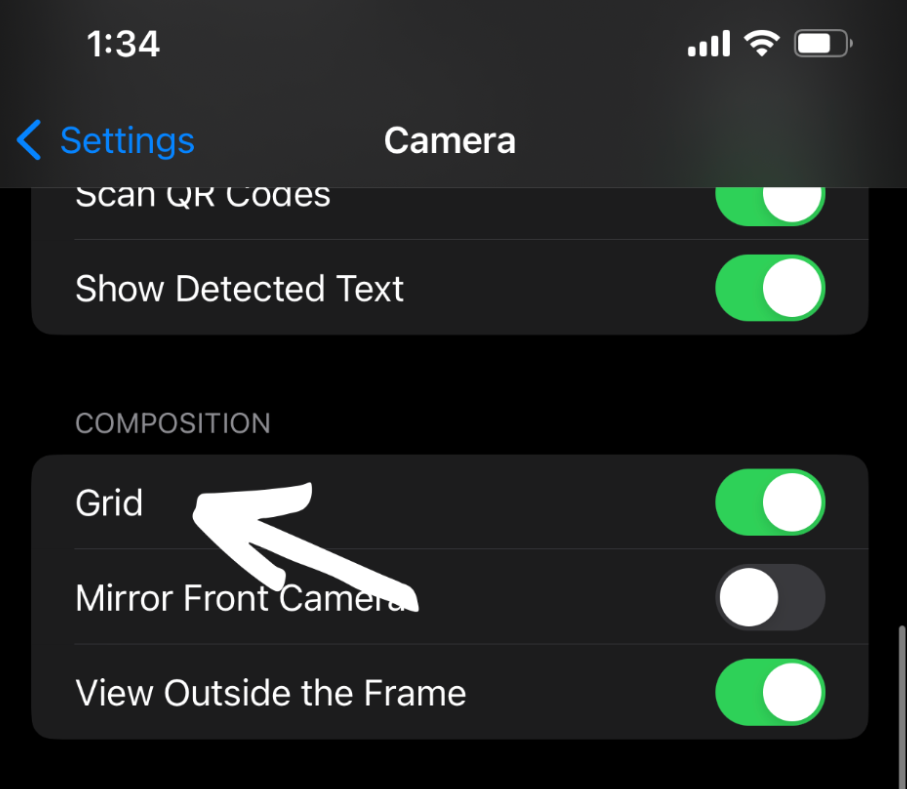
To position photos like a pro, turn on the camera grid setting.
All this does is add a 3×3 grid to your back/front camera, allowing you to better give directions to those shooting photos of you and create aesthetically-composed images.
A popular photo composition is the “rule of thirds,” executed when the subject is positioned in one of the three-thirds of the image. Use this tip when you want more of the background in your snap. The sweet spot is that middle square– just enough background, not too much floor, and you get your whole outfit in the pic.
7. Capture full scenes with panorama.
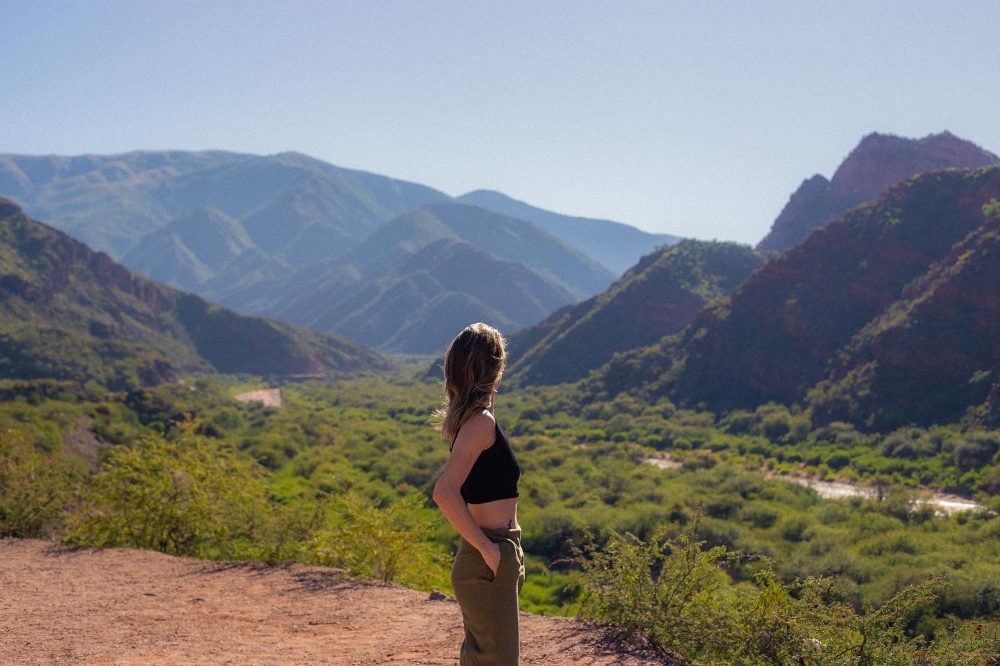
When in Rome (or a giant valley, like the above pic), scenery is everything. To pose against stunning backdrops like a pro, panorama mode is your friend.
Wide-angle mode is wonderful, but it is prone to body distortion and captures less of the scene than you may like.
If you want a cool, edgy photo in front of a tall backdrop, turn your phone horizontally, position yourself in the middle ⅓ of the grid, and hold the pose as the photo-taker slowly moves up to the top of the scene. Watch this trick in action below.
8. Mess with Portrait Mode’s lighting settings.
Available on iPhone SE, 7+, 8+, and later models.
iPhone’s Portrait mode delivers ultimate background-blur action while adding an array of photo-lighting styles. Intentionally blurry backgrounds are essential building blocks to unique photos.
When selecting portrait mode, the camera zoom is automatically set to 2.5x. Change this back to the 1x setting unless you’re taking a business headshot.
The best modes for portraits are the natural, studio, and contour light settings; the others are better suited for product imagery.
But did you know you can adjust the lighting even further?

Swipe up while on any portrait mode setting to adjust:
Flash
Exposure
Self-timer
Filter
F-stop/depth of field
Our personal recommendation is to avoid applying filters until after you shoot your pics. Some filters pull too many details from an otherwise epic portrait.
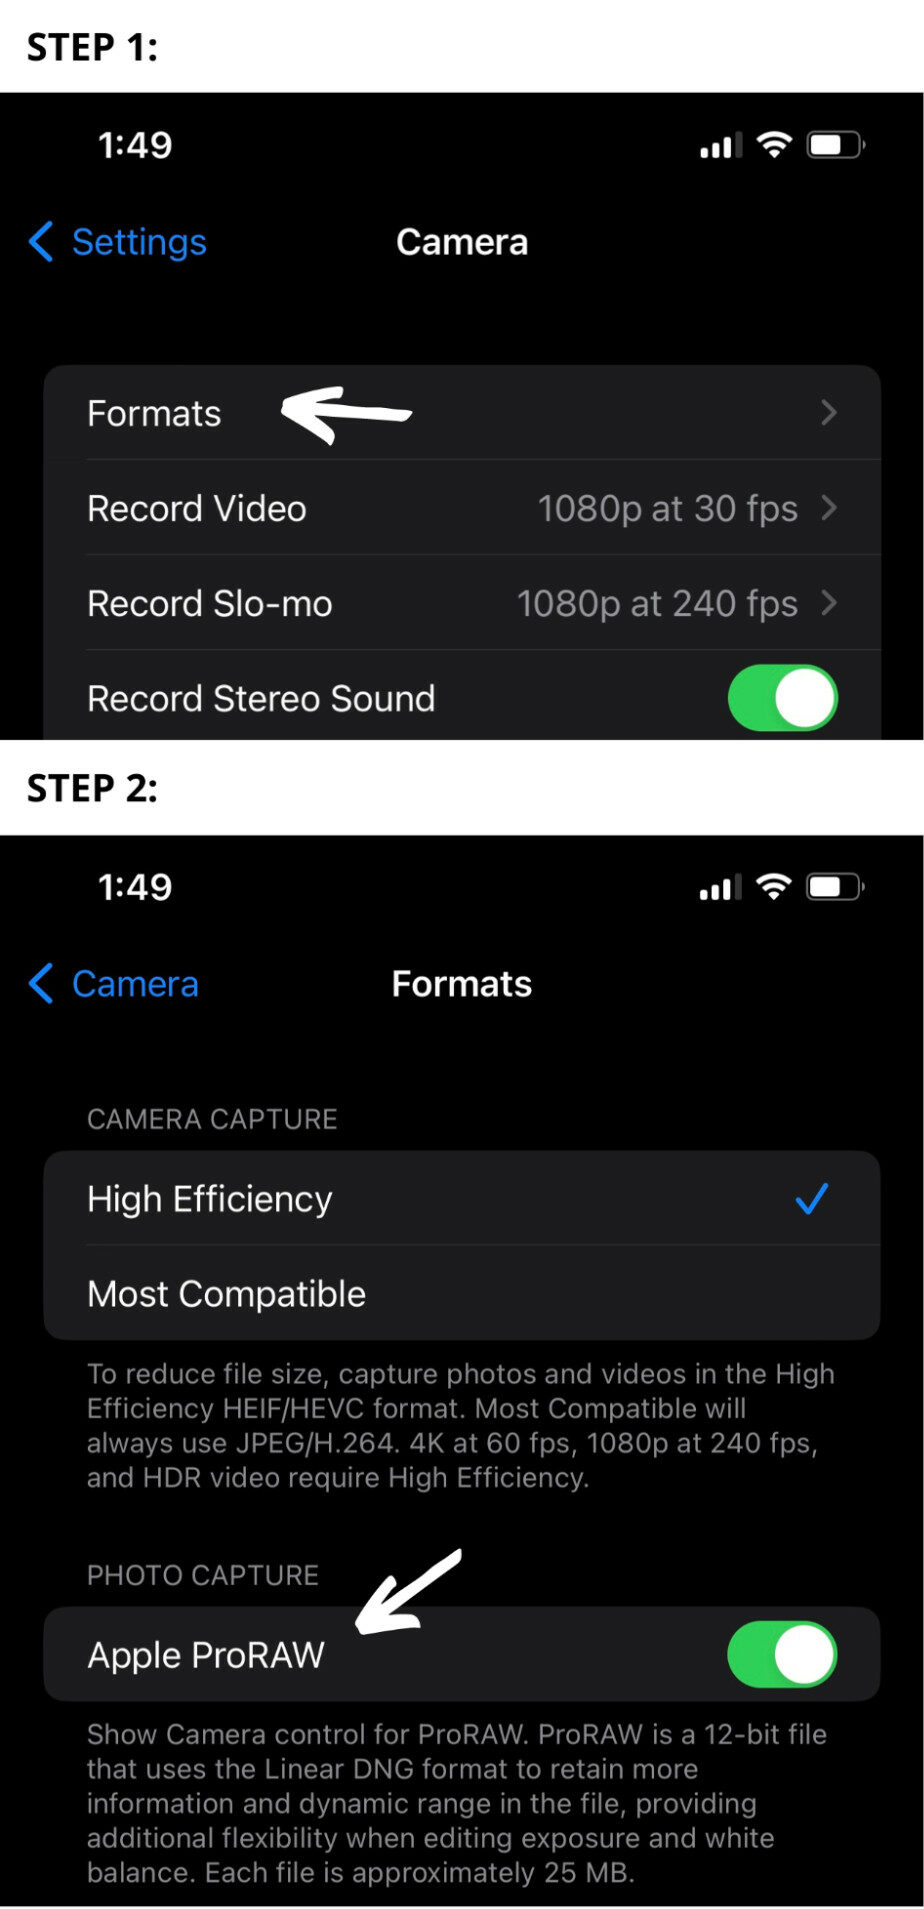
9. Change photo format to RAW.
iPhone settings > Camera > Formats > Apple ProRAW
Most photographers shoot photos in RAW, a highly-defined image quality, allowing ample opportunities for post-editing. And iPhones just so happen to have the same photo image quality options.
Turn on this setting when you take professional photos or want to mess around with post-production. Turn it off for day-to-day captures since the images are approximately 25MB each click, taking up way more storage than your usual snap.
10. Get creative with Live Photo settings.
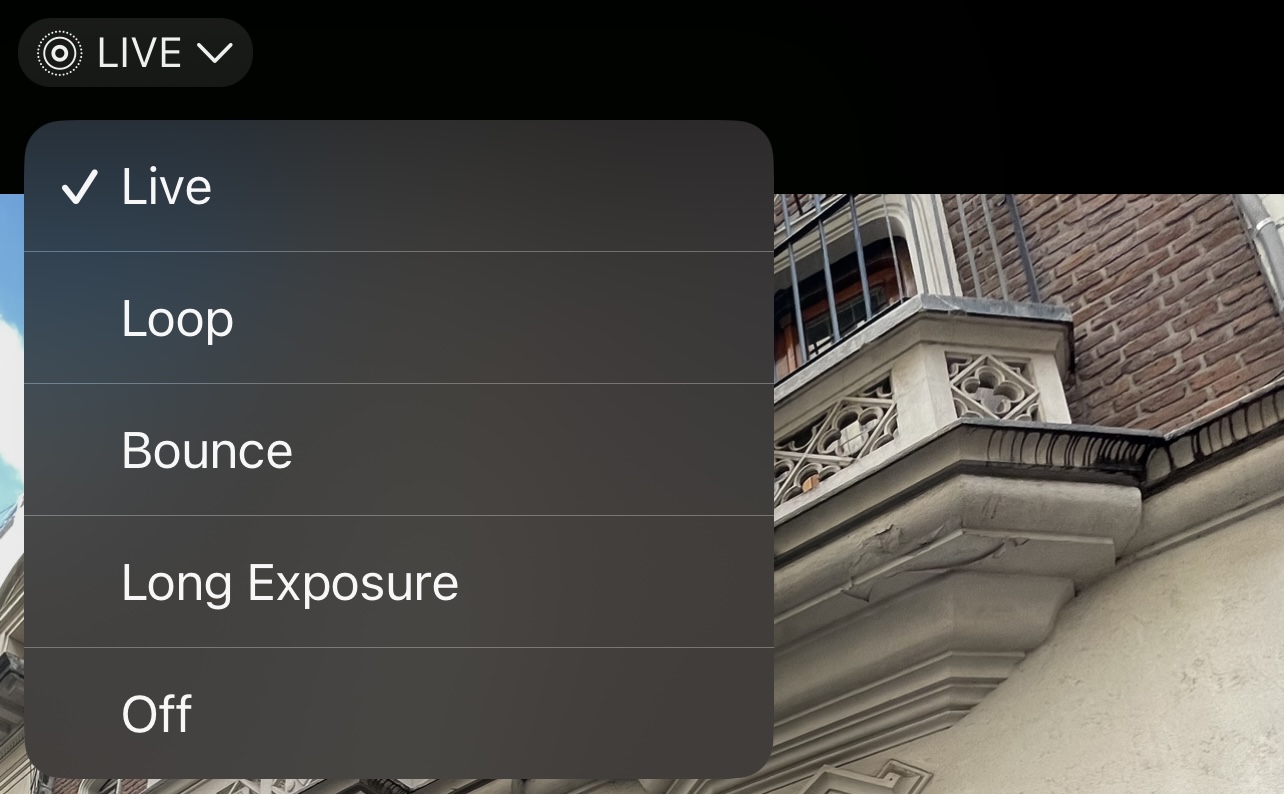
After shooting a live photo, go to the image in your photo gallery, click the upper left “live photo” icon, and explore the four live photo options:
- Loop
- Bounce
- Long Exposure
- Off
To make your live photo into a gif or boomerang (Instagram), select Loop or Bounce. They’re about the same, except Loop adds a trippy transition as it repeats (it’s an acquired taste).
Long exposure will slow everything dow-w-w-w-n, such as creating tracks of lights (cars at night) or smooth water patterns (flowing water). Since the camera is letting more light in with a slower shutter speed, the image outcome will be decently lit– even at night. Just do not forget to stabilize any long exposure shot with a tripod.
Have you tried any of these tips before? Any new tricks you want to try to upgrade your photo game?
Test out your best-improved snaps on Photofeeler!