


Galaxy users, these tips are for you!
From lighting to camera hacks– there’s a bit of everything here. Some info you may already know (oooh, look at you!), and others might be totally new concepts– either way, you got it!
At the end of this article, you’ll be able to fully utilize your Galaxy’s photo modes, capture all your best angles, and have a few photo tricks up your sleeve for social media snaps.
1. Get rid of distractions with Magic Eraser.
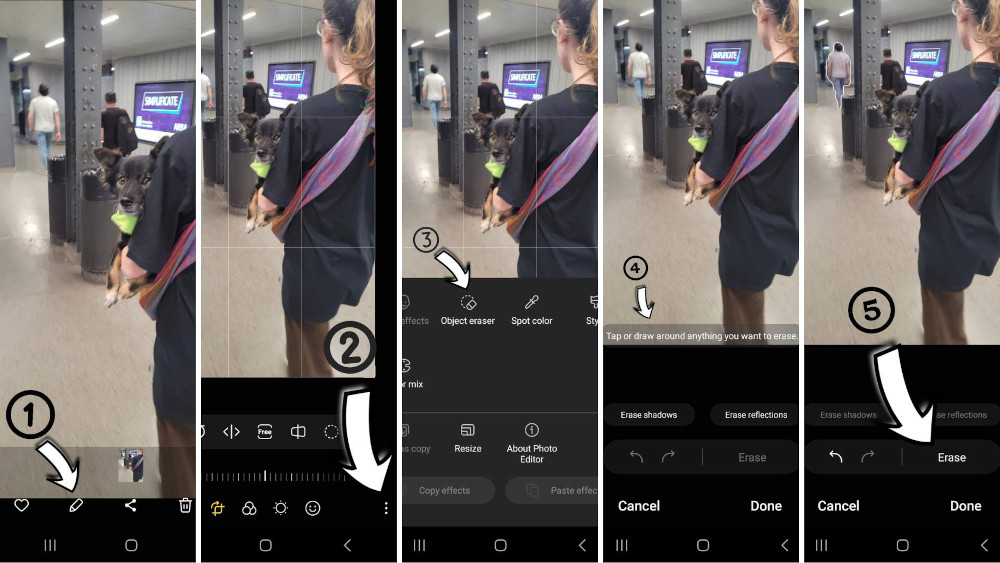
Gallery > Photo to Edit > Pencil icon > Three dots in bottom right > “Object Eraser”
There is a hidden eraser tool on Samsung Galaxy, but you need to be running the software One UI 3.1 to find it.
Once you’ve chosen the photo you’d like to remove your ex- I mean, a distraction from, simply click the object/person/thing, and your phone will work its magic.
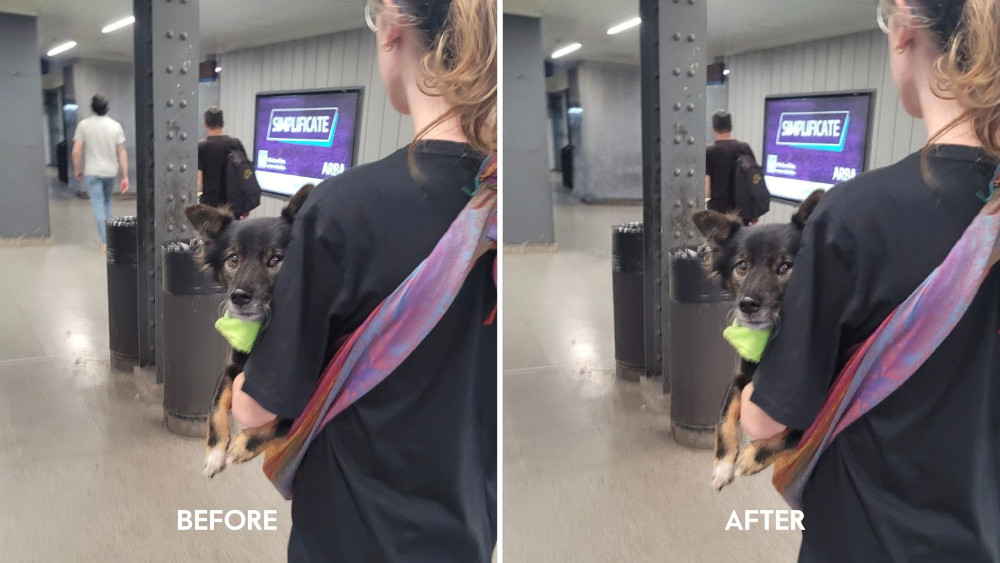
It’s pretty obvious that it removed something since the background area is usually blurry, but that’s okay. Nobody will notice unless you tell them.
2. Edit with Portrait Effect.
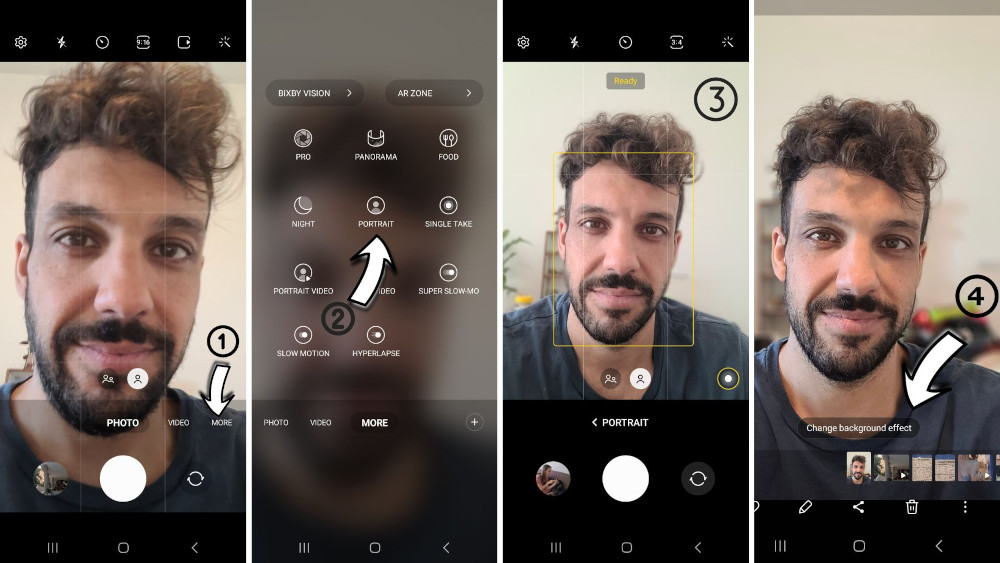
Camera App > Portrait > Slider for Effects
The Galaxy’s portrait mode has a few effects that can supercharge your photo, like background blur, studio lighting, and color point.
The only two features that are useful for portraits are the blur and color effects; the other features look overedited and transposed on different backgrounds, almost like a cutout.
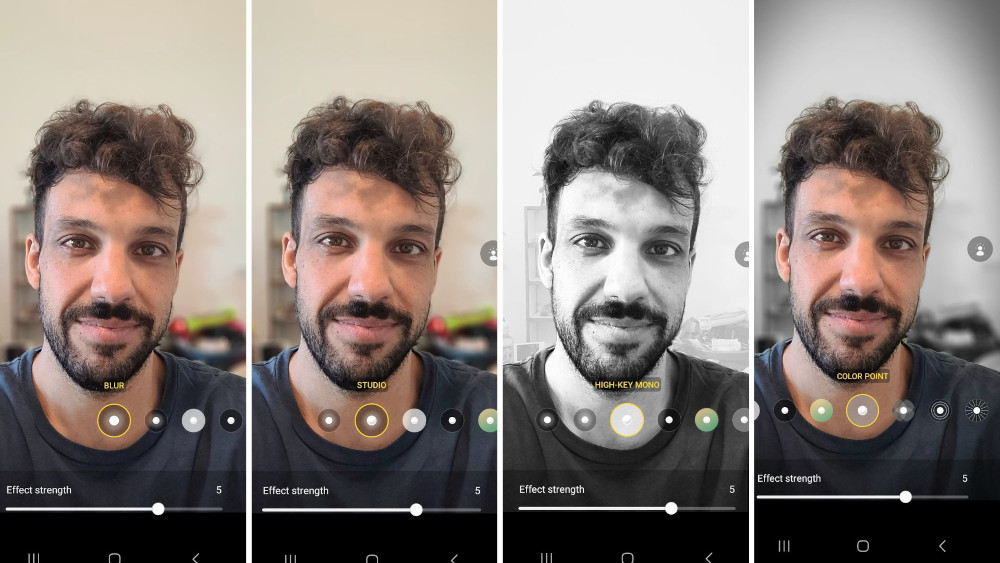
The blur feature makes you stand out even more because it focuses on you without any background distractions. The color point feature is like a glorified HDR effect, enhancing the colors around you for a bolder look.
3. Utilize Remaster Photo feature.
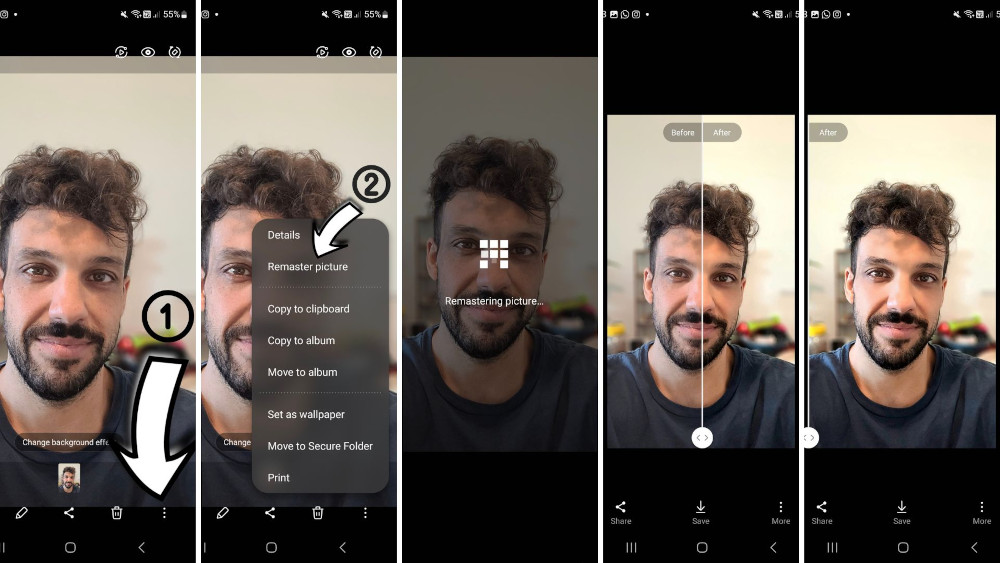
Gallery > Select Photo > Three Dots > “Remaster Picture”
This super easy effect enhances your photo quality, colors, and contrast in just one click.
It’s like the “Lux” effect on Instagram, with an all-over color boost.
While this effect is impressive, it’s all or nothing. You can’t adjust the result, so whatever enhancements the app suggests are the final edits. Look out for over-saturation when using the Remaster effect on close-up portraits; it tends to overedit skin tones.
4. Shoot in RAW image format.

Settings > Advanced picture options > RAW copies
Most photographers shoot photos in RAW, a highly-defined image quality, allowing extended opportunities for post-editing.
Samsung Galaxy has the same photo image quality options.
Turn on this setting when you take professional photos or want to mess around with post-production. Just make sure to turn it off for day-to-day captures since the images are approximately 25MB each click, taking up way more storage than your usual snap.
5. Switch to 50MP resolution.
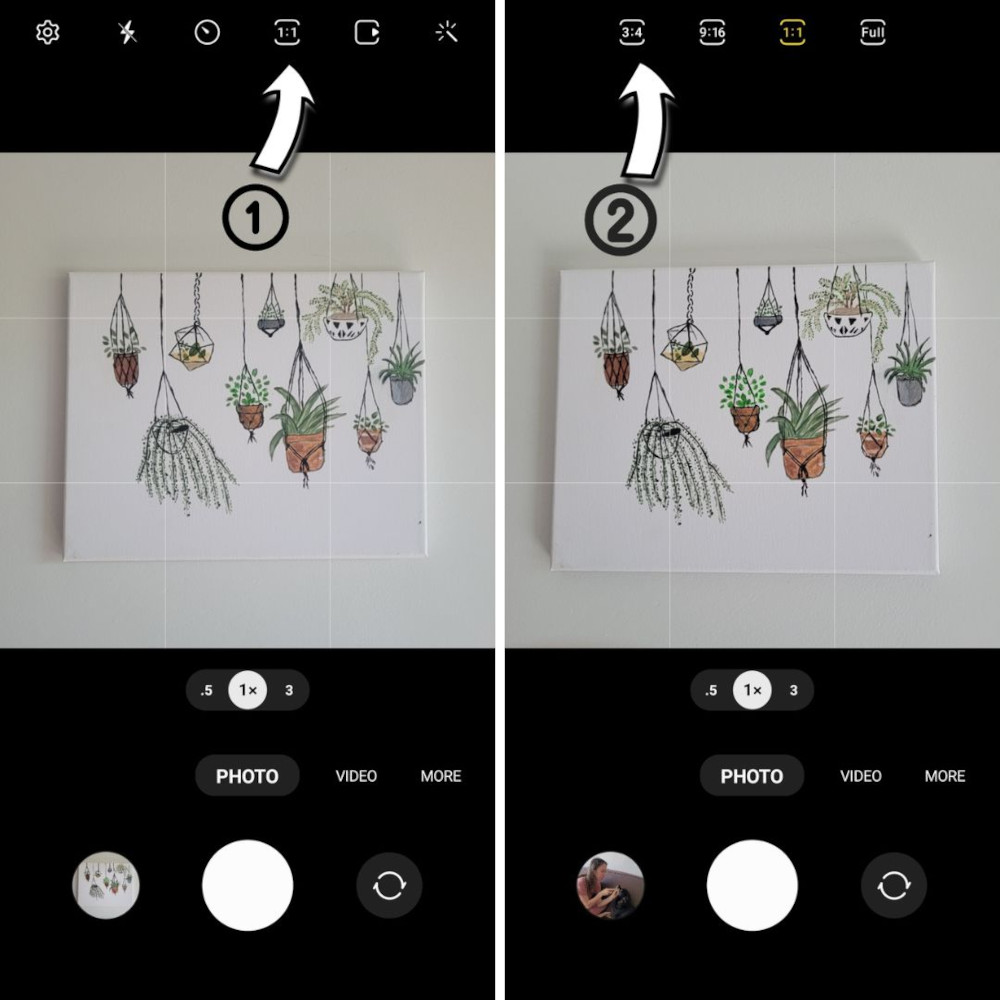
Camera App > (1:1) Camera Ratio > 3:4 64MP/50MP
Older Galaxy models offer up to 50MP resolution; newer models shoot up to 64MP.
Both RAW formatting and 50/60MP resolution significantly increase the image quality of your phone’s photos. You can closely edit blemishes, adjust colors and highlights, and more.
Same as the RAW formatting, it’s best to turn off this mode when shooting everyday things because of the storage size– yikes!
6. Turn on “Scene Optimizer.”
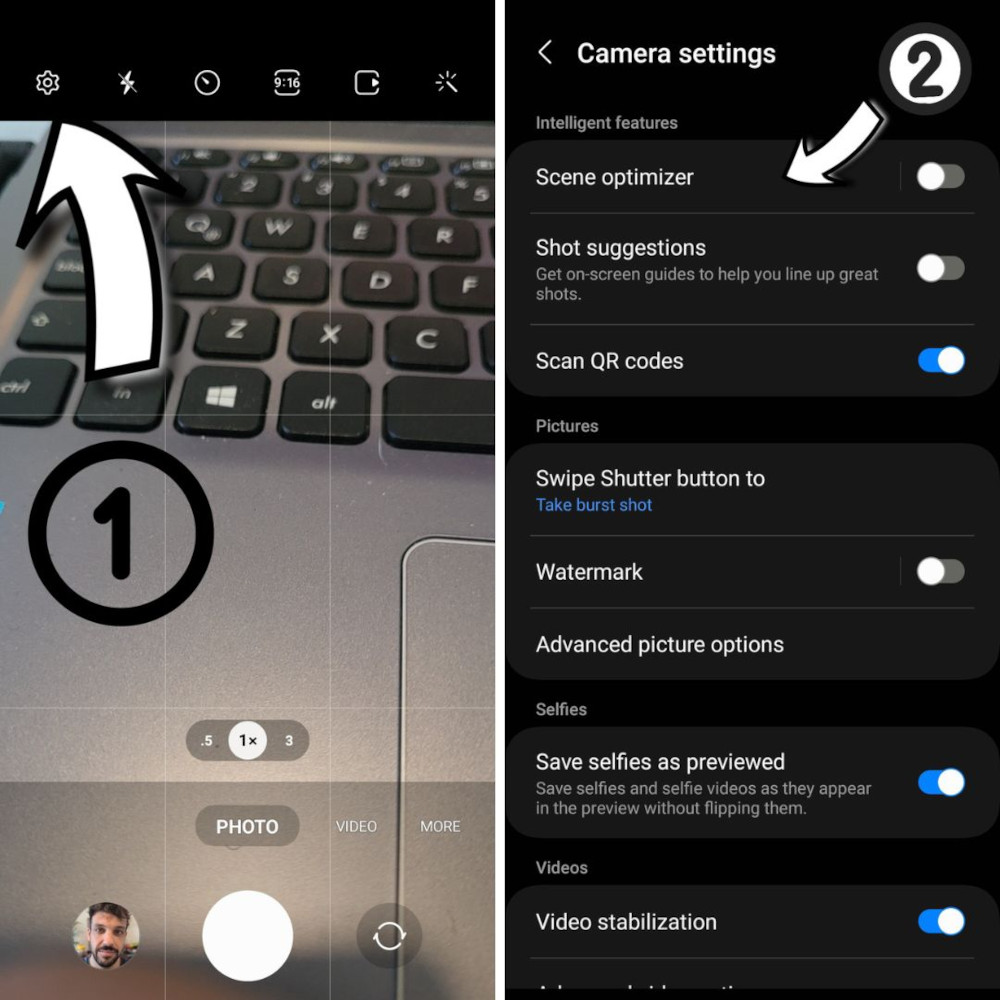
Camera App > Settings > “Scene Optimizer”
Samsung Galaxy’s scene optimizer is epic, boasting over twenty different modes, like portraits, backlit, screen scenes, and landscapes.
Your phone will automatically read the photo and apply color enhancements accordingly. However, this feature is only available on the back camera, which works well, considering the rear camera specs are much better quality than the selfie cam.
Turn off this setting when you’re shooting with a look in mind, as it does emphasize colors you may not want to be emphasized.
7. Get technical in Pro Mode.
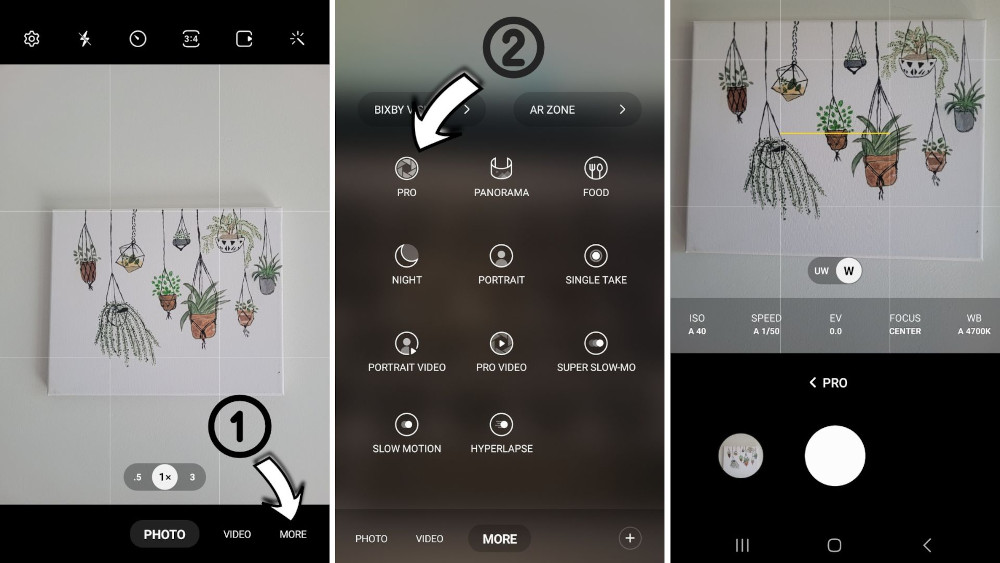
Camera App > “MORE” > “Pro”
Pro mode is a step up into the photography game, allowing users to manually adjust the shutter speed, exposure, white balance, and filters.
This is handy when shooting in direct sunlight, warm tones, or at night with less light. Here’s a quick rundown on how each of these settings can help improve your image:
-
- Shutter Speed– The slower the shutter speed, the more light in your camera. If you want a cool night portrait, you must put your phone on a tripod or something stable to reduce the blur.
- ISO– Keep the ISO value low if it is bright, and high if you’re capturing motion or it’s dimly lit. The higher the ISO, the more pixelated your portrait will be.
- White Balance– Adjust the natural whites in your image to match the eye. Your phone will automatically change the whites in a photo to whatever color hue or temperature it sees. That’s why some pictures look orange in the sunlight and blue/cool in the shade.
Learn more about lighting terms and adjustments with our lighting guide.
8. Turn on “Single Take.”
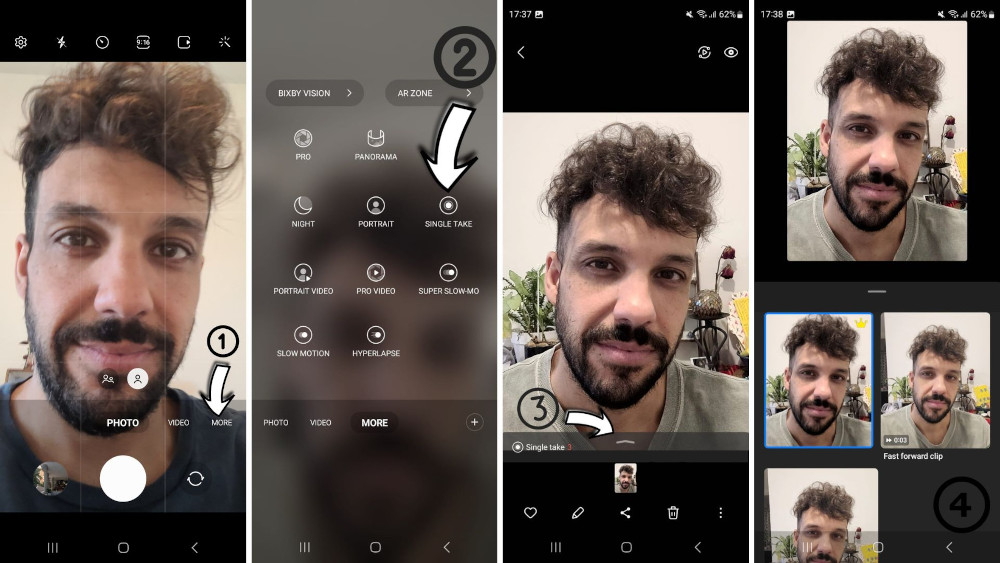
Camera App > “MORE” > Single Take > open menu and choose your favorite
To capture natural expressions without awkwardness, turn on Single Take. This setting is like taking a 10-second video, but better, because it upholds the image quality of a photo instead of a blurry screen capture from a video still.
Single Take is Samsung’s equivalent of Apple’s “Live Photos” and Google’s “Top Shot” features. Using AI, your phone records a 10-second video of a subject and saves multiple options in a photo, boomerang, or short clip.
After capturing your pic, grab the moment that captures you best by clicking the “single take” button in the image gallery and choosing your favorite snap.
Whala! A cheeky capture of a natural smile without any awkward countdowns or the need to hold a smile.
9. Color tone your selfies.
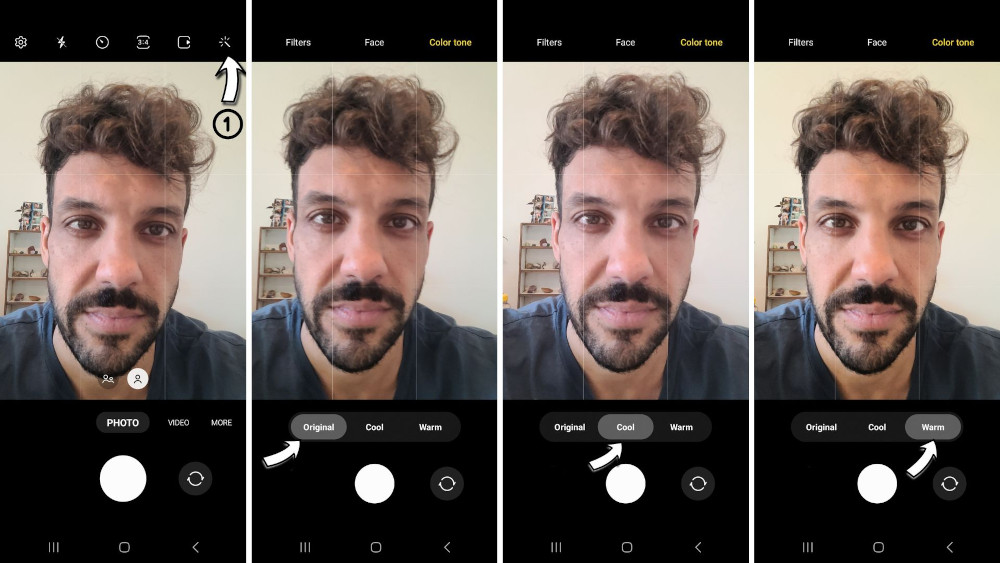
Camera App > Selfie Camera > Effects (top right) > “Color Tone”
A new effect, available after the One UI 5.1 software update, allows users to color tone their selfies in a natural or bright style.
The natural color tone has less contrast, making the skin look smooth and glossy. It looks good and natural, but double-check that you’re not looking too plastic before you toss the pic up on Photofeeler. When in doubt, do a quick test.
The bright color tone effect is pretty noticeable, but we can see where it could come in handy.
Both of these effects are useful in smoothing out sunspots and blemishes. After the photo, we suggest increasing the sharpness a wee bit since the filter reduces the clarity.
10. Make your own self-timer.
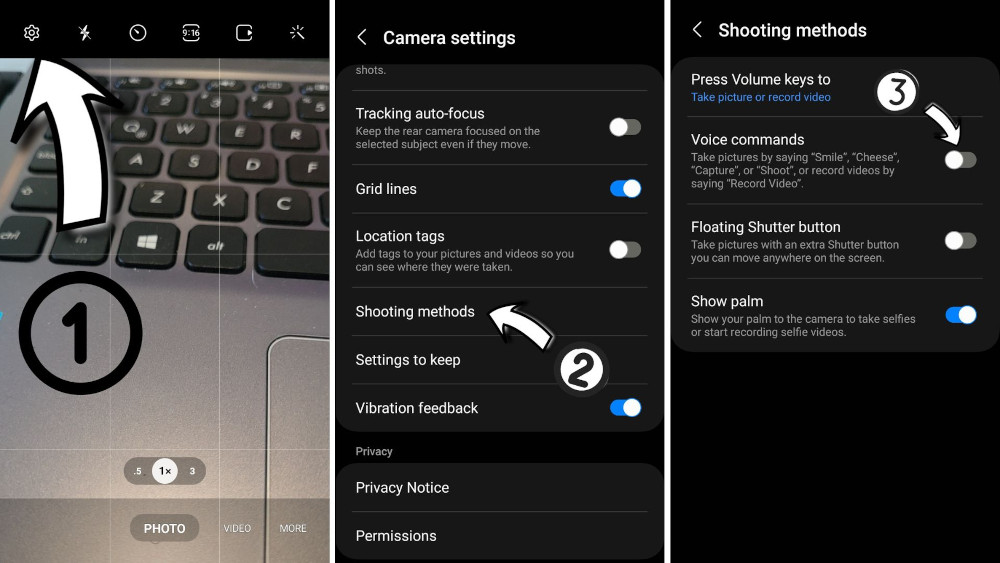
Camera App > Settings > Shooting methods (Rear) > Voice commands
Rather than doing a mad dash to get in front of the camera in less than 10 seconds, use voice command to set a self-timer.
You need to manually set the voice command for both the selfie and back cameras separately. As always, we recommend shooting on the rear camera for that saucy image quality. *chefs kiss*
Before you snap the photo, read the list of voice commands for your phone model, as some have changed. Then, get your personal paparazzi on and take the best photos of yourself ever.
You can still run and jump in front of the camera if you want the self-timer experience and extra cardio, but we don’t suggest it when Galaxy’s made it this easy to strike a pose from afar.
Have you tried any of these tips before? Any new tricks you want to try to upgrade your photo game?
Let us see your best improved snaps up on Photofeeler!